
Section 4.2 Geometrical constructions

Geometrical construction is the process of creating geometric shapes, figures, or diagrams using basic tools, like a compass, ruler and protractor. The goal is to draw precise shapes without measurements, relying on rules of geometry. Examples of geometric constructions include drawing a line segment, bisecting an angle, or constructing a perpendicular e.t.c

Subsection 4.2.1 Measuring angles

  • Measuring angles is a significant topic in geometry. An angle can be measured using a protractor. An angle is measured in degrees, hence its called degree measure. One complete revolution is equal to \(360^\circ\text{,}\) hence it is divided into \(360\) parts. Each part of the revolution is a degree. If we know how to measure angle, then it will be very easy to construct an angle using a protractor.
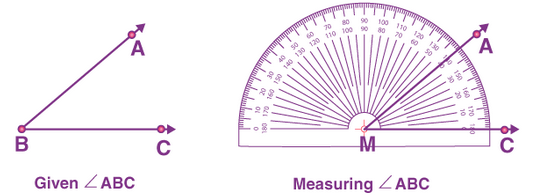
  • A protractor is a semi-circular tool used to draw and measure angles. It is marked with degrees from \(0^\circ\) to \(180^\circ\text{.}\) It can be directly used to measure any angle from \(0^\circ\) to \(360^\circ\) . The markings are made in two ways, \(0^\circ\) to \(180^\circ\) from right to left and vice versa.

Activity 4.2.2.

Suppose we have an angle to measure say, \(\angle ABC\text{.}\) Follow the steps given below to measure the angle.
  1. Put the protractor above the line \(BC\) such that the midpoint of protractor is at point \(B\text{.}\)
  2. Adjust the protractor in such a way that \(BC\) is parallel to the straight-edge of the protractor.
  3. The protractor has two scales marked from \(0^\circ\) to \(180^\circ\) on both the ends. Take the reading where \(BC\) coincides with the \(0^\circ\text{.}\)
  4. Now from \(0^\circ\text{,}\) check the line \(BA\) coincides with the curved edges of the protractor. This reading gives us the measure of angle \(ABC\text{.}\)

Subsection 4.2.2 Bisecting angles

What is an angle bisector ?
An angle bisector or the bisector of an angle is a line that divides an angle into two equal parts. For example, In the applet below, the blue line is said to be an angle bisector of angle \(BAC\text{.}\)
The gray slider adjusts the entire measure of angle \(BAC\text{.}\)
The black slider dynamically illustrates what it means for a line to bisect an angle.
Figure 4.2.7.

Activity 4.2.3.

How to construct an angle bisector?
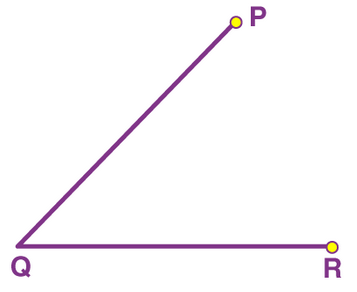
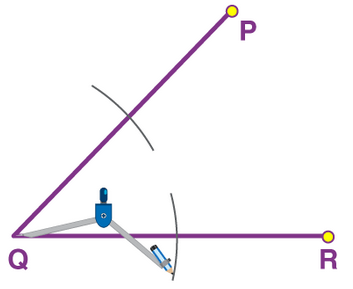
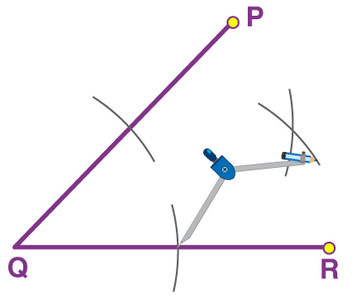
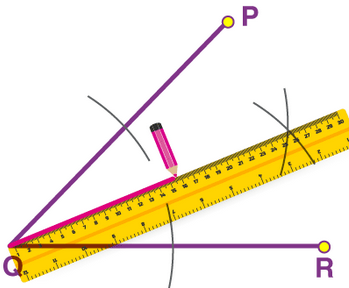
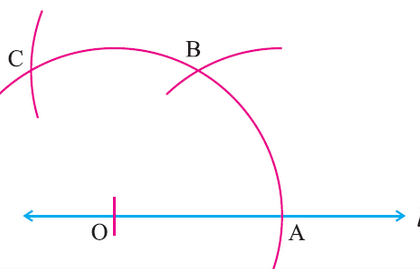
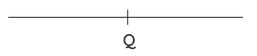
You require a ruler and a compass to construct angles and their bisectors. Given a known or unknown \(\angle PQR\text{,}\) the steps to construct its angle bisector are:
  1. Place the compass pointer at \(Q\) and make an arc that cuts the two arms of the angle at two different points.
  2. From the point where the first arc cut the arm \(QP\text{,}\) make another arc towards the interior of the angle.
  3. Without changing the radius on the compass, repeat step \(2\) from the point where the first arc cut \(QR\text{.}\)
  4. Using a ruler, draw a line from \(Q\) to the point where the arcs intersect.
The line that was drawn through \(Q\) represents the angle bisector of the \(\angle PQR\text{.}\)
Note: If an angle bisector bisects a line segment at \(90^\circ\text{,}\) it is known as the perpendicular bisector of that line.
The figure below shows a Perpendicular Bisector of a Line Segment
Figure 4.2.8.

Example 4.2.11.

If an angle bisector divides an angle of \(120\) degrees, then what is the measure of each angle?
Solution.
Given, a measure of an angle is \(120^\circ\)
As we know, the angle bisector divides the angle into equal two parts.
Therefore, \(120^\circ\) is divided into equal two parts, say \(x\text{.}\)
Hence,
\begin{equation*} x^\circ + x^\circ = 120^\circ \end{equation*}
\begin{equation*} 2x = 120^\circ \end{equation*}
\begin{equation*} x = \frac{120^\circ}{2} \end{equation*}
\begin{equation*} x=60^\circ \end{equation*}

Subsection 4.2.3 Geometrical construction of \(90^\circ, 45^\circ, 22.5^\circ\)

Subsubsection 4.2.3.1 Drawing Angles Game

Subsubsection 4.2.3.2 Constucting \(90^\circ\)

Activity 4.2.5.
Work in pairs.
What you need: A ruler, a protractor and a pair of compasses.
1.Draw a straight line and mark on it point \(O\text{.}\) With point \(O\) as the centre, make arcs to cut the line at \(A\) and \(B\) as shown below.
2. Using \(A\) and \(B\) as the centres, make arcs abave the line to meet at point \(C\) as shown below.
3.Join points \(O\) to \(C\) as shown below.measure angle \(BOC\) and \(COA\text{.}\) Which angles have you constructed?
Expected observations
\begin{equation*} \angle BOC = \angle COA = 90^\circ \end{equation*}

Subsubsection 4.2.3.3 Constucting \(45^\circ\)

Subsection 4.2.4 Geometrical construction of \(60^\circ, 30^\circ, 15^\circ, 7.5^\circ\)

Subsubsection 4.2.4.1 constructing \(60^\circ\)

Activity 4.2.8.
Work in pairs
What you need: A ruler, a protractor and a pair of compasses.
Explore
1.Draw a straight line and mark a point \(O\) on it as shown below.
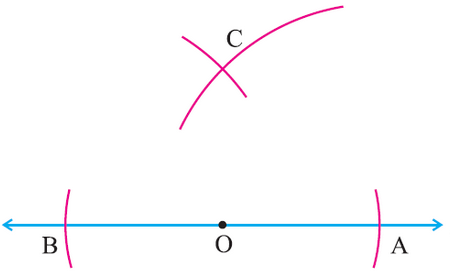
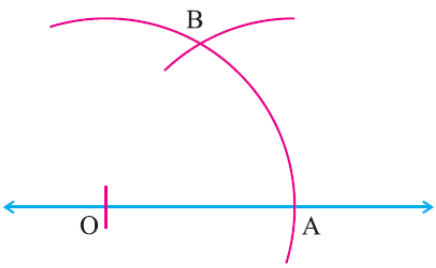
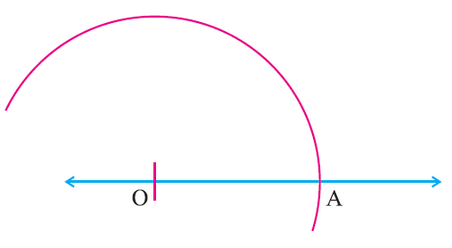
2. With \(O\) as center draw an arc of any radius to cut the line at \(A\text{.}\)With the same radius and \(A\) as center draw an arc to cut the previous arc at \(B\text{.}\)
3. Join \(OB\text{.}\) Measure angle \(AOB\text{.}\) Which angle have you constructed?
Expected observation.
We get the required angle
\begin{equation*} \angle AOB = 60^\circ \end{equation*}

Subsubsection 4.2.4.2 Constructing \(30^\circ\)

Figure 4.2.23.
Activity 4.2.9.
Work in pairs
What you need: A ruler, a protractor and a pair of compasses.
Explore.
1.Construct \(60^\circ\) (as shown in the above activity).
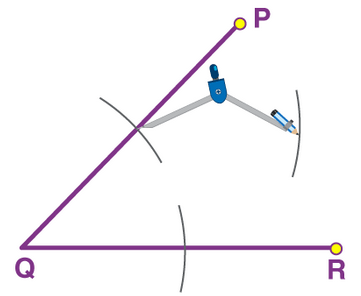
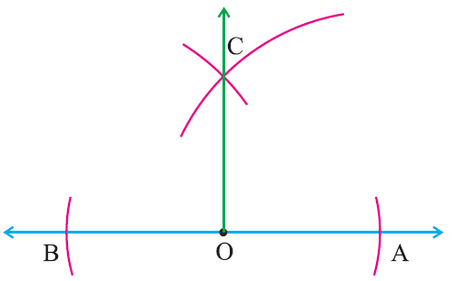
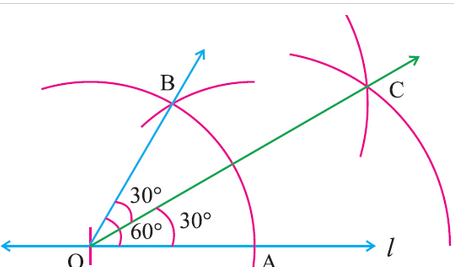
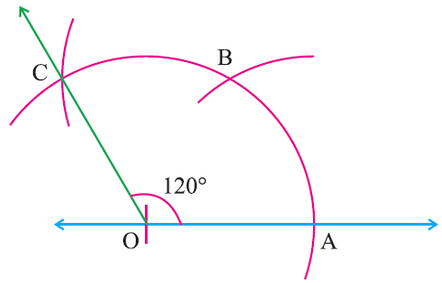
2.With \(A\) as center, draw an arc of radius more than half of \(AB\) in the interior of \(\angle AOB\text{.}\) With the same radius and with \(B\) as center draw an arc to cut the previous one at \(C\text{.}\)
3.Join OC. Measure \(\angle AOC\text{.}\)
Expected observation.
We get the required angle
\begin{equation*} \angle AOC = 30^\circ \end{equation*}

Subsubsection 4.2.4.3 Constucting angle \(15^\circ\)

Figure 4.2.24.

Subsection 4.2.5 Constructing \(\angle 120^\circ\)

Activity 4.2.10.

Work in pairs
What you need: A ruler, a protractor and a pair of compasses.
Explore.
1.Draw a line and mark a point \(O\) on it.
2.With \(O\) as center draw an arc of any radius to cut the line at \(A\text{.}\)
3.With same radius and with \(A\) as center draw another arc to cut the previous arc at \(B\text{.}\) With \(B\) as center draw another arc of same radius to cut the first arc at \(C\text{.}\)
4.Join \(OC\text{.}\) We get the required angle
\begin{equation*} \angle AOC = 120^\circ\text{.} \end{equation*}

Subsection 4.2.6 Constructing triangles

A triangle is a basic shape with three sides and three angles. The three sides of a triangle can have different lengths, and the angles can vary in size, but the sum of the angles in any triangle is always \(180^\circ\text{.}\)
Figure 4.2.28. Determine whether three segments can form a triangle
Types of Triangles
Triangles can be classified based on angles and sides.
  1. Scalene Triangle.
  2. Equilateral Triangle.
  3. Isosceles Triangle.
  4. Obtuse Triangle.
  5. Acute triangle
  6. Right-angled triange.
Figure 4.2.29. Draw triangles with given characteristics.

Subsubsection 4.2.6.1 Constructing equalateral triangles

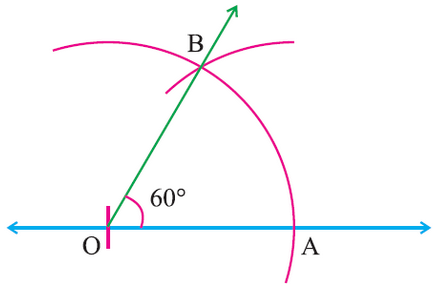
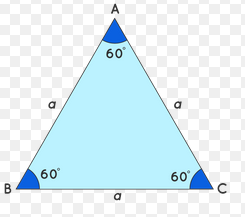
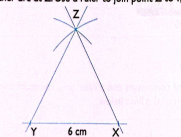
An equilateral triangle is a triangle that has all its sides equal in length. Also, the three angles of the equilateral triangle are equal to \(60^\circ\text{.}\) The sum of all three angles of an equilateral triangle is equal to \(180^\circ\) .
Activity 4.2.12.
Work in pairs
What you need: A ruler, a pair of compasses and a protractor.
Explore.
1.Draw a straight line. Mark point \(Y\) on the line.
2.Using a pair of compasses and and a ruler, mark point \(X\text{,}\) \(6\) \(cm\) away from \(Y\text{.}\)
3.With \(Y\) as the centre and using radius of \(6\) \(cm\text{,}\) draw an arc abave the line.
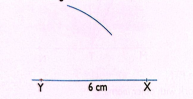
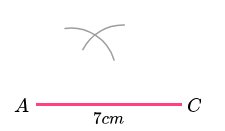
4.with \(X\) as the centre and using the same radius draw another arc abave the line to intersect the other arc at \(Z\text{.}\) Use a ruler to join point \(Z\) to \(Y\) and point \(Z\) to \(X\)
5. Measure \(\angle XYZ\text{,}\) \(\angle ZXY\) and \(\angle XZY\text{.}\) What do you notice?
6.Share your work with other learners in class.

Subsubsection 4.2.6.2 Constructing isosceles triangle

An Isosceles triangle is a triangle that has two equal sides. Also, the two angles opposite the two equal sides are equal.
Figure 4.2.31.
Properties of isosceles triangle.
  1. As the two sides are equal in this triangle, the unequal side is called the base of the triangle
  2. The angles opposite to the two equal sides of the triangle are always equal.
  3. The altitude of an isosceles triangle is measured from the base to the vertex (topmost) of the triangle.
Activity 4.2.13.
Work in pairs
1.Draw a straight line. Mark point \(M\) on the line.
2.Using a pair of compasses and and a ruler, mark point \(N\text{,}\) 5 \(cm\) away from \(M\)
3.With \(M\) as the centre and using radius of \(7\) \(cm\text{,}\) draw an arc abave the line \(MN\text{.}\)
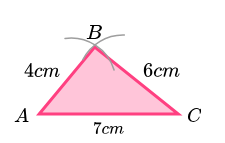
4.with \(N\) as the centre and using the radius of ,\(5\) \(cm\text{,}\) draw another arc abave the line to intersect the other arc at point \(P\text{.}\) Use a ruler to join point \(P\) to \(M\) and point \(P\) to \(N\text{.}\) Measure sides \(PM\text{,}\) \(MN\) and \(NP\)
5. Measure \(\angle MNP\text{,}\) \(\angle MPN\) and \(\angle PMN\text{.}\) What do you notice?
6.Share your work with other learners in class.

Subsubsection 4.2.6.3 Constructing right-angled triangle

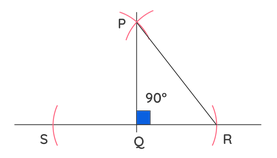
A right-angled triangle is a type of triangle that has one of its angles equal to \(90^\circ\text{.}\) The other two angles sum up to \(90^\circ\text{.}\) The sides that include the right angle are perpendicular and the base of the triangle. The third side is called the hypotenuse, which is the longest side of all three sides.
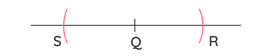
The three sides of the right triangle are related to each other. This relationship is explained by Pythagorean theorem.
Activity 4.2.15.
Work in pairs
1.Draw a straight line of any length. Mark point \(Q\) on the line.
2.With \(Q\) as the center, and \(5\) \(cm\) as the radius, draw an arc on both the sides of the point such that the arc touches the horizontal line and mark the points as \(S\) and \(R\text{.}\)
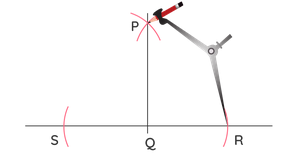
3. With \(S\) as the centre and using radius of \(8\) \(cm\text{,}\) draw an arc abave the line. With the same radius of \(8\)\(cm\text{,}\) draw an arc from the point \(R\text{.}\) Mark the point of intersection of these arcs as \(P\text{.}\)
4. Join the points \(P\) to \(Q\) and \(P\) to \(R\) with a ruler.

Subsubsection 4.2.6.4 Constructing scalene triangle.

This is a triangle in which all three sides are of different lengths and all the three angles of the triangle are also of different measures.
Figure 4.2.33.
Activity 4.2.16.
Work in pairs
Constructing triangle \(ABC\) such that sides \(AB=4\) \(cm\text{,}\) \(BC=6\) \(cm\) and \(AC=7\) \(cm\text{.}\)
  1. Draw a straight line \(AC\) of length \(7\) \(cm\text{.}\)
  2. With \(A\) as the centre and using a radius of \(4\) \(cm\text{,}\) draw an arc abave line \(AC\text{.}\)
  3. With \(C\) as the centre and using a radius of \(6\) \(cm\text{,}\) draw an arc to intersect the other arc at point \(B\text{.}\)
  4. Join point \(AB\) and point \(BC\text{.}\) Measure sides \(AB\text{,}\) \(BC\) and \(AC\text{.}\)
  5. Measure angle \(ACB\text{,}\) \(ABC\text{,}\) and \(BAC\text{.}\) What do you notice ?

Subsection 4.2.7 Construction of circle using a ruler and a pair of compasses.

Activity 4.2.17.

Work in groups.
(i) mark a point \(O\text{.}\)
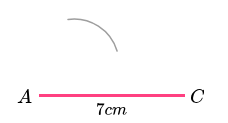
(ii) Adjust a pair of compasses to a length of \(7\)\(cm\) from \(O\text{.}\) Turn the compass arm with the pencil until it get back to the initial point.
(iii) Discuss the results and share with other groups
Figure 4.2.34.